Skip navigation
For over 35 years, Intelligent PCB Manufacturing
Automation Software
Be production ready in minutes, not days.
Information on file / folder permission issues
Additional installation troubleshooting information
Software version information and software release schedule
Installation switches and MSI mass installation
There are several types of software installations for the Unisoft
software outlined below. They are a
fresh install to a new computer that
has not had the Unisoft software previously installed and a
software update to a
computer with the software already installed. Also you can choose to
install the Unisoft license file which allows additional feature privileges.
In addition the menus displayed can be customized and this is useful
when the software is used in various departments on your production floor.
The software installation setup below will install the Unisoft Pronto software on your hard drive (c:\program files (x86)\unisoft by default, or c:\program files\unisoft).
You may install the Unisoft software on additional computers if properly licensed to do so. By installing the Unisoft software you agree to the terms of the license. Licensing may be confirmed periodically. Software features and functions are subject to change without notice. Any misuse may void the license. By installing or otherwise using the Unisoft software you agree to be bound by the terms of the current Unisoft End-User License Agreement (EULA).
Click or cut and paste into your browser the following link:
https://www.unisoft-cim.com/download/requests/view-markup/view5.zip
After the download is complete unzip VIEW5.ZIP then double-click on VIEW5.EXE and follow the instructions on the screen to install the software. Please accept the default path on installation, it can be changed later.
The installation is complete for the viewer software. If you wish please contact us for training.
Troubleshooting Pronto software: If the Unisoft Pronto software does not run correctly after installation it is usually a folder / file permissions issue. To see if it is a permissions issue try installing Unisoft software to a new directory that you the installer creates on the C: root drive, for example c:\unisoft-test and if the software runs correctly there it is most likely a permissions issue which you or your IT department can correct. Also you can contact Unisoft and we can go online with you to help.
Troubleshooting CELLS Workflow MES software: Note: If you are having issues with running the Unisoft CELLS Workflow MES Product Tracking software and the software does not start correctly after installation it is usually a folder / file permissions issue. To see if it is a permissions issue try installing the software to a new directory that you the installer creates on the C: root drive, for example c:\cells-test and if the CELLS software runs correctly there it is most likely a permissions issue which you or your IT department can correct. Also you can contact Unisoft and we can go online with you to help.
In the procedure above you installed the Unisoft viewer software. For certain PC's on your production floor you may wish to have only the limited functionality of the Unisoft viewer software installed above. For these computers please skip the license installation procedure in this section.
You may install the license on additional computers if properly licensed to do so. By installing the license you will be giving additional functionality to the Unisoft viewer software. By installing you agree to the terms of the license. Licensing maybe confirmed periodically. Software features and functions are subject to change without notice. Any misuse may void the license. By installing or otherwise using the Unisoft software you agree to be bound by the terms of the current Unisoft End-User License Agreement (EULA).
Please unzip to your desktop the license file received from Unisoft. At this point you should see the file MARKUP.LIC on your desktop. Next copy that file into the Unisoft directory: c:\program files (x86)\unisoft by default, or c:\program files\unisoft.
You may delete the file MARKUP.LIC on your desktop.
The license installation is complete and the licensed software is now active.
Troubleshooting: PROBLEM NEW LICENSE NOT BEING SEEN: When you first start the software a splash screen appears and with the license properly installed in that window you will see in the first sentence of the first paragraph will say "this product is licensed to >> " and after that it will indicate your company name and other licensing information. If you see this then the license is installed properly.
If after installing the new license using the procedure above provided you start the Unisoft software and it appears that the new license is not being seen you can either contact Unisoft directly and we will go online and help you with the issue or you can try the following.
*LICENSE NOT BEING SEEN CORRECTLY - VIRTUALSTORE DIRECTORY ISSUE:
When the Unisoft software is not seeing the license file correctly then the problem can be the following. Sometimes the problem is that when a valid license file, a markup.lic file, is manually copied to replace the existing markup.lic file in the default directory c:\program files(x86)\unisoft and the Unisoft software when started does not detect the new license file is that the Microsoft operating system is redirecting the Unisoft software to use another older copied of the Unisoft license file.
The Microsoft Windows OS will sometimes create a protected VirtualStore directory and in that directory there will be subfolders of protected directories such as \Program Files(x86), \Windows, etc. Then when files are manually or otherwise copied to the actual directory such as c:\Program Files(x86) and c:\Windows virtual copies of these files are also copied to the VirtualStore directory. Then when the software application program is started the Windows OS redirects the software application to use the file(s) in the VirtualStore directory instead of where it was originally copied to.
This VirtualStore directory issue is not something that Unisoft controls and software programs other than Unisoft also have this same issue.
From what we understand the Microsoft Windows OS uses this VirtualStore directory to protect from viruses, etc. when files are manually copied to protected directories.
So the problem can usually be remedied by either removing or overwriting the VirtualStore directory copy of the file(s) in question.
If you do have a VirtualStore directory it will usually be under your USER directory and an example follows c:\user\xxxx\appdata\local\virtualstore\ where xxxx is your Windows user log-in name. The markup.lic file maybe found at c:\user\xxxx\appdata\local\virtualstore\program files(x86)\unisoft.
For additional installation troubleshooting information click here.
Unisoft subscription customers automatically have a current Unisoft software license contract and can update their software to the latest version at anytime using the procedure below. For customers with other types of Unisoft software licensing if your license contract which includes updates, support and maintenance is up to date then you can use the procedure below to download and install the latest version of the software and it will be enabled automatically, however if your license contract has expired do not install this release and contact Unisoft to find out how to enable this new release.
Follow the procedure below to install the Unisoft Pronto software update on computers with the software already installed.
By installing the Unisoft software you agree to the terms of the license. Licensing maybe confirmed periodically. Software features and functions are subject to change without notice. Any misuse may void the license. By installing or otherwise using the Unisoft software you agree to be bound by the terms of the current Unisoft End-User License Agreement (EULA).
To install the Unisoft Pronto software update click or cut and paste into your browser the following link: https://www.unisoft-cim.com/download/update-view.zip
After the download is complete unzip the file UPDATE-VIEW.ZIP to your desktop. Next double-click the file UPDATE-VIEW.EXE on your desktop and follow the instructions on the screen to install the software. Please install to the directory where the Unisoft software was previously installed (c:\program files (x86)\unisoft by default, or c:\program files\unisoft).
You may delete the file UPDATE-VIEW.EXE on your desktop.
The installation is complete! If you wish please contact us for training.
Troubleshooting: If the Unisoft software does not run correctly after installation it is usually a folder / file permissions issue. To see if it is a permissions issue try installing Unisoft software to a new directory that you the installer creates on the C: drive root, for example c:\unisoft-test and if the software runs correctly there it is most likely a permissions issue which you or your IT department can correct. Also you can contact Unisoft and we can go online with you to help.
For more information on file / folder permission issues click here
Troubleshooting: PROBLEM NEW LICENSE NOT BEING SEEN: When you first start the software a splash screen appears and with the license properly installed in that window you will see in the first sentence of the first paragraph will say "this product is licensed to >> " and after that it will indicate your company name and other licensing information. If you see this then the license is installed properly.
If after installing the new license using the procedure above provided you start the Unisoft software and it appears that the new license is not being seen you can either contact Unisoft directly and we will go online and help you with the issue or you can try the following.
For additional installation troubleshooting information click here.
Training is available virtually anytime online. Also the software has HELP for most menu items by hovering over the menu item for a second then click any of the videos, manual or website links to learn about the software.

User manuals for the Unisoft Pronto series software in Microsoft Word are installed on the computer in the directory: c:\program files\unisoft by default, or c:\program files(x86)\unisoft. These same manuals are also available online. The online manuals can be translated into approx. 100 languages by clicking "select Language" in the upper right of the webpage.

Customize your menus and splash page. You can customize the menus displayed and this is useful when the software is used in various departments on your production floor. For example, for personnel performing PC Board inspection with the free Unisoft PCB assembly / PCBA viewer software you can simplify its use by removing the menus that are not necessary in that department. You can also add custom Splash Page text that will be displayed when the software is first started such as "UNISOFT VIEWER FOR USE IN THE INSPECTION DEPARTMENT".
TIP: A recommendation if the Unisoft PCB assembly / PCBA viewer is used on the production floor is to remove the SAVE and SAVE AS menus that are located on the FILE menu so that production floor personnel will be unable to overwrite your "golden" .F2B file. To remove the SAVE and SAVE AS menu items from the FILE menu insert the following text in the MARKUP.INI file. More details below.
[TailoredMenus]
File|Save=N
File|Save As...=N
Below is a brief explanation of how to customize the Menus and Splash Page. Please contact Unisoft if you need additional details on how to use this feature.
Before:

After:

TO USE: All menus with the exception of FILE, VIEW and SHOW can be modified or removed. To modify the MENUS go to the MARKUP.INI file located in the WINDOWS directory. Then under the [TailoredMenus] section insert the menu control you wish. Below are examples:
To remove for example the Quote/Quality menu insert the following in the MARKUP.INI file.
[TailoredMenus]
Quote/Quality=N
Before:

After:

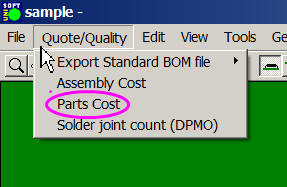
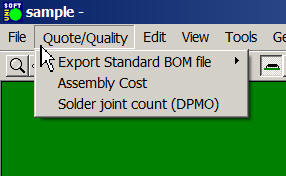
To remove for example the sub-menu "Parts Cost" under the Quote/Quality menu insert the following in the MARKUP.INI file.
[TailoredMenus]
Quote/Quality|Parts Cost=N
Before:

After:

Note 1: If the [TailoredMenus] section is not in your MARKUP.INI file you can manually insert it at the top of the file.
Note 2: If after editing the MARKUP.INI file in the Windows directory you don't see any change in the software display then on certain computers you may need to also copy the MARKUP.INI you just edited in to the VirtualStore directory. The VirtualStore directory for Windows is usually located in a path similar to the following c:\Users\xxxx\AppData\Local\VirtualStore\Windows, and you can copy the file there and overwrite any existing file.
Test to see if it displays ok.
Note 3: If you are still having difficulty and the software menu(s) are not changing on the display then try the following. First copy the MARKUP.INI in the WINDOWS directory to your desktop. Then from your desktop open the MARKUP.INI and edit your [TailoredMenus] section as desired and save the file. Next copy the MARKUP.INI file on your desktop back to your WINDOWS directory and overwrite the file already there. Next copy the MARKUP.INI file on your desktop back to your VirtualStore directory for Windows, usually located in a path similar to c:\Users\xxxx\AppData\Local\VirtualStore\Windows, and copy the file there and overwrite any existing file.

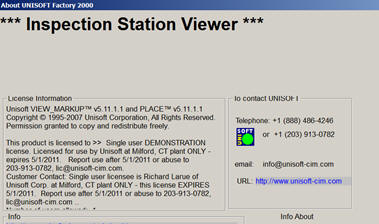
TO USE: To modify the SPLASH page go to the MARKUP.INI file located in the WINDOWS directory. Then under the [TailoredMenus] section insert SplashText=INSPECTION STATION VIEWER. Below is an example:
[TailoredMenus]
SplashText=INSPECTION STATION VIEWER
Result:

Note 1: If the [TailoredMenus] section is not in your MARKUP.INI file you can manually insert it at the top of the file.
Note 2: If after editing the MARKUP.INI file in the Windows directory you don't see any change in the software display then on certain computers you may need to also copy the MARKUP.INI you just edited in to the VirtualStore directory. The VirtualStore directory for Windows is usually located in a path similar to the following c:\Users\xxxx\AppData\Local\VirtualStore\Windows, and you can copy the file there and overwrite any existing file.
Test to see if it displays ok.
Note 3: If you are still having difficulty and the software menu(s) are not changing on the display then try the following. First copy the MARKUP.INI in the WINDOWS directory to your desktop. Then from your desktop open the MARKUP.INI and edit your [TailoredMenus] section as desired and save the file. Next copy the MARKUP.INI file on your desktop back to your WINDOWS directory and overwrite the file already there. Next copy the MARKUP.INI file on your desktop back to your VirtualStore directory for Windows, usually located in a path similar to c:\Users\xxxx\AppData\Local\VirtualStore\Windows, and copy the file there and overwrite any existing file.