Operator's Guide
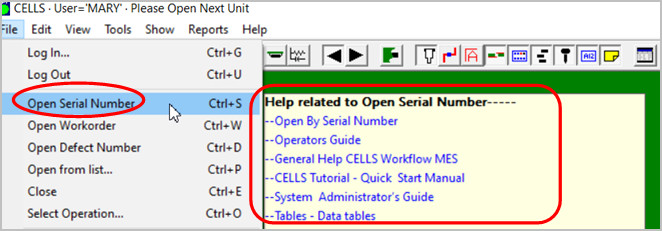
Note: The CELLS Workflow MES has HELP for most menu items by hovering over the menu item for a second then click any of the videos, manual or website links.
Objectives
- Overview of CELLS
- Logging on the CELLS system
- Viewing documents in the CELLS system
- Viewing component history
- Viewing a task list
- Viewing and logging defects
- Moving to the Next Step
- Logging off the CELLS system
1. Overview
CELLS is powerful manufacturing software that is easy to use. Some of the features include:
- Easy access to the documents you need to help get your job done easier.
- The system tracks where the component is and tells you the next step.
- Easy to use defect logging window. You can select most defects from a drop-down menu.
- A task list that tells you in a step-by-step procedure what is required before passing the component to the next step.
- Ability to view the history of a component. Where it's been, what's been
done to it, etc.
2. Log On the System
Logging On
To log on the CELLS system:
- Click Start on the taskbar.
- Select Programs.
- Select UNISOFT ….
- Select CELLS. The "Please Log In" dialog box opens. See Figure 1.
- In the Station box, type or select your station.
Note: The first time you log on to your station, you will have to enter your station number. Going forward you will not have to enter the station number unless you share a station.
- In the User Id box, type your Id.
- In the Password box, type your password.
- Click OK.
Figure 1. Log in dialog box
Opening Units
You can open units by one of the following methods:
- By Serial Number
- By Work Order and Quantity
- By Defect Number
- Open from list
By Serial Number
This is the easiest way to open a unit. After the serial number is entered, the system then goes through a series of checks.
- Checks to see if you are authorized to access the system.
- Checks to see what is the next step.
- Finds an assembly Id.
- Find associated information topics and documents.
- Finds drawings and overlays associated with the serial number.
- Finds the history for the serial number.
- On the File menu, click By Serial Number. The Enter Serial Number dialog box opens. See Figure 2.
- In Serial Number box, type the serial number.
- Click OK. A window opens telling you the current operation and asking you if you want to perform that operation.
- Click Yes. See Figure 3.
Figure 2. Enter Serial Number dialog box
Figure 3. Message box with the current operation
By Work Order and Quantity
Opening a unit by Work Order enables you to look up a unit if you do not have a serial number. This method can be used to look up un-serialized assemblies or multiple units (by lot or portion of a lot).
- On the File menu, click By Work Order and Quantity. The Enter Serial Number dialog box opens.
- In Serial Number box, type the serial number.
- Click OK. The Unit opens.
By Defect Number
This code is assigned when a part is removed from a board. This Id will tie the part back to the original board.
- On the File menu, click Open Defect Number. The Enter
Defect Number dialog box opens.
- Type the defect number.
- Click OK. The Unit opens.
Open from List
This option enables you to select from a list of work that is waiting at your current operation.
- On the File menu, click Open from List. The
Select From Incoming Work dialog box opens.
- Choose the work to be opened.
- Click OK. The Unit opens.
3. Document Management
Dynamic View Menu
The document management features of CELLS give you the ability to access documents to assist with your work and give you the help you need at the click of a button.
- Open the View menu. On the lower portion of the menu, you will see the documents you can access at this step. See Figure 4.
- On the View menu, click an info page, board view or overlay. The screen displays annotations, highlighted areas, or information page opens depending on what is selected on the View menu.
In the example in Figure 5, Inspection Points was selected on the View menu.
- To clear all the annotation on the screen, on the View menu, click Clear All Annotations.
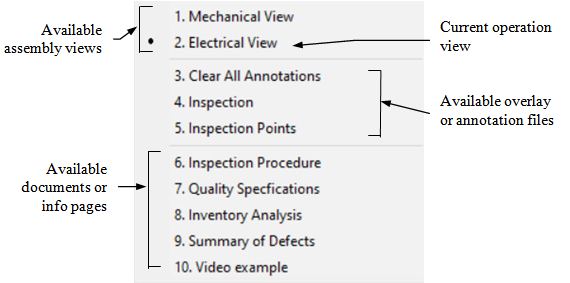
Figure 4. The View menu
Note: Depending on the operation you are doing, not all documents, overlays, info pages, or assembly views are available.
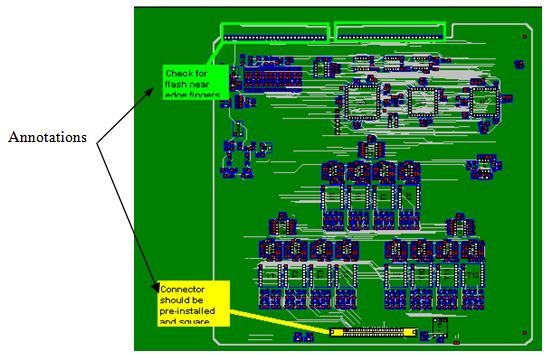
Figure 5. Examples of Annotations
Context Menu
To access information for a component, use the Info Tool.
- Make sure you are in Info mode by clicking the Info tool button.

- Click in the middle of the component you want information about. The Info menu opens. See Figure 6.
Note: The menu changes depending on the step and component you are working on. If there is document information available, a context menu opens. If there is no document information, you will get component information.
- Click the top menu item. The Component Information window opens giving you component information.
- Close the Component Information window.
- Click the bottom menu item. The Quality Alert window opens giving you additional information. See Figure 7.
- Close the Quality Alert window.

Figure 6. Context Menu
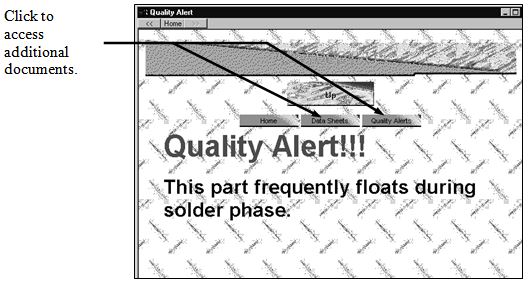
Figure 7. Quality Alert Window
4. Viewing History
You may wish to view the history of a unit to see where it's been, what's been done to it, or the defects that have occurred. CELLS provides you an easy way to find that information.
- On the View menu, click Current Unit History. The Unit History dialog box opens. See Figure 8.
Note: The Unit History dialog box displays a listing of items for a unit. See Table 1 Unit History Descriptions.
- To find out additional information on each item, double-click an item in the list. The History Item Details dialog box opens. See Figure 9.
- Close the History Item Details dialog box.
- Close the Unit History dialog box.
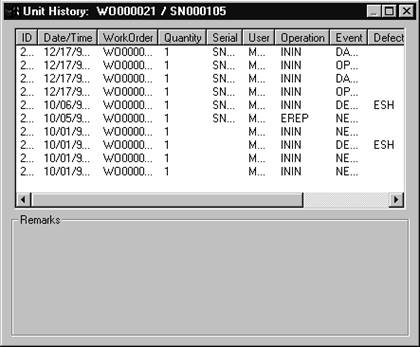
Figure 8. Unit History dialog box
Table 1. Unit History Descriptions
| Option |
Description |
| ID |
Unique record identifier. Each record is assigned the next highest number. |
| Date/Time |
Date and time the event occurred. |
| Work Order |
The work order number corresponding to the unit. |
| Quantity |
If the unit is opened by serial number, the quantity equals 1 (individual unit). |
| Serial |
The serial number of the unit. If the unit is opened by work order number, this may be blank. |
| User |
The user logged into the system. |
| Operation |
The operation the user is performing. |
| Event |
The type of event. |
| Defect |
If the item pertains to a defect, a defect code appears. |
| Ref1 |
If the item pertains to component RefDes, a Ref1 number appears. |
| Ref2 |
If the item pertains to component RefDes, a Ref2 number appears. |
| Other ID |
If the event involves a sub-assembly, this field may contain the ID of the other unit. |
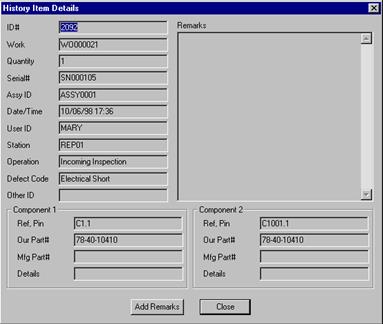
Figure 9. History Item Details dialog box
5. Task List
The Task List is a list of instructions to be completed for the unit at this point. See Table 2 Task List Descriptions.
- On the File menu, click Task List. The Tasks to do at this operation dialog box opens. See Figure 10.
- Double-click a task in the list. The edit window opens. See Figure 11.
- In the lower window, type the required information.
- Click OK.
- After completing the tasks, click OK again.

Figure 10. Task List
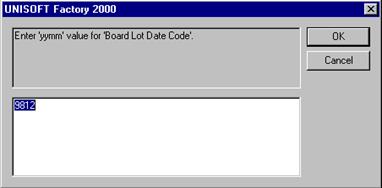
Figure 11. Edit Window
Table 2. Task List Descriptions
| Option |
Description |
| All Operations |
If checked, all operations will be listed that can be completed in the entire process. |
| Task |
List of things that occur at this step in the operation. |
| Required |
Y = a required step.
N = not a required step. |
| Value |
The data that was entered. |
| Edit button |
Highlight a task and then click Edit to modify and enter data. |
| Recall All |
Click Recall All to give each item the last value for that kind of item. |
| Clear All |
Erases all the values. |
6. Logging Defects
CELLS saves you time logging defects. Many of the defect codes are in the system. You can select the problem with the click of the mouse.
- On the File menu, click Log a Defect. The Enter History Item dialog box opens. See Figure 12.
- Verify the assembly information (serial number, work order, operator, etc.)
- In the Defect Code box, select a Defect Code. Component 1 and Component 2 areas will display drop-down combo boxes giving you the option to select additional component information. See Figure 13.
- To enter another defect, click Save and New. If you are finished enter defects, click Save and Close.
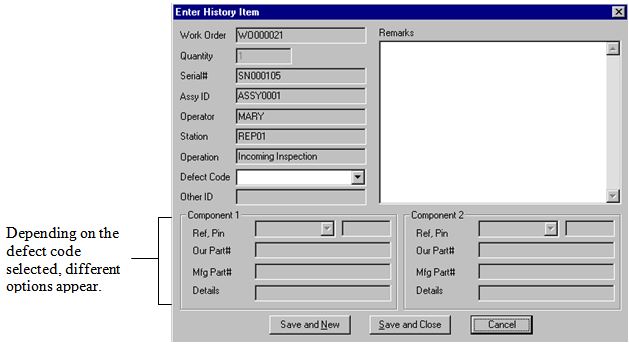
Figure 12. Enter History Item dialog box
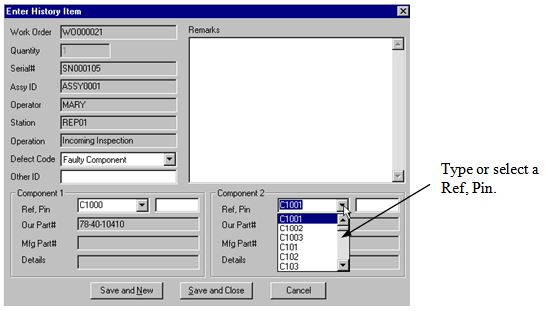
Figure 13. Component 1 and Component 2 areas
7. Moving to the Next Step
- On the File menu, click Next Step. The Next Step dialog box opens. See Figure 14.
- Click one of the following (see Table 3 Next Step Descriptions):
- Pass
- Specific Failure Mode
- Click OK.

Figure 14. Next Step dialog box
Table 3. Next Step Descriptions
| Option |
Description |
| Pass |
Operation completed successfully. |
| Specific Failure Mode |
Additional outcome codes are user defined. See your system administrator. |
8. Logging off the System
Depending on your system setup, when completing your work you can then log off the system.
- On the File menu, click Exit.