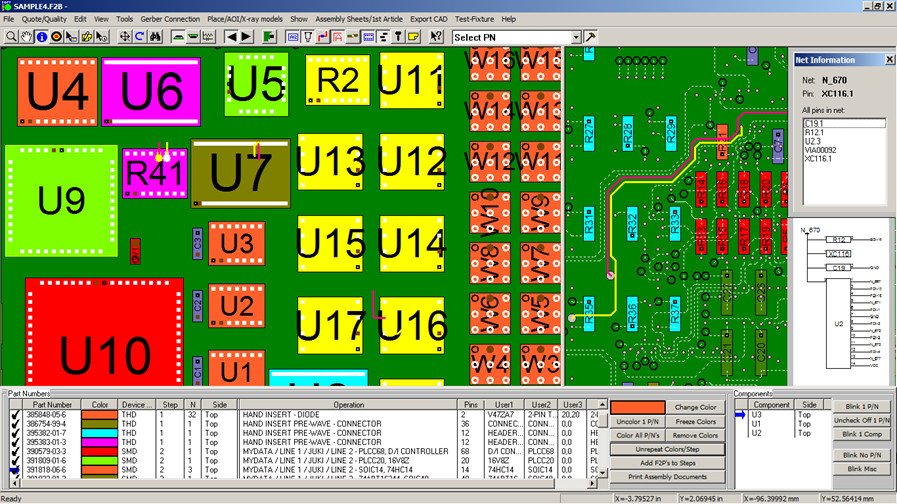
The Unisoft software can import virtually any Bill Of Materials (BOM) file. Upon importing the BOM information it is fixed to each component and when the component is selected that information is displayed. Additionally this data is used for output from our assembly and test software modules.
The Unisoft software does extensive cross-checking of the BOM it's one of the most critical factors in starting a job process for New Product Introduction (NPI) for electronics OEM and contract manufacturers. This can be especially true for electronics contract manufacturers who do not know if the different data sources that they get from their many customers BOM and CAD match and is actually reliable data to build the PCB assembly / PCBA with. There are many areas that the Unisoft software automatically cross-checks in the BOM and other features of the software that can determine the validity of the BOM - https://www.unisoft-cim.com/features.htm#Cross-checking_the_Bill_of_Materials_(BOM).

BOM files come in many formats styles. There are two methods for teaching the Unisoft software how to import a BOM file. The first is Automatic and the second is Manual and they are detailed below. It is recommended to use the Automatic method.
Note: PACKAGE DATA — In some cases when your creating assembly or AOI machine setup program files for your PCB assembly / PCBA you may need the package/shape information, for example 0805, 1206, PLCC44, etc. If the shape information is available in your BOM file the Unisoft BOM importer can import it via the "USER 2" field. To do this in the Unisoft BOM importer in the User2 field indicate which field in the BOM file contains the part shape data. Then when the assembly or AOI setup programs are created the Unisoft software will include the user2 field package shape data in the output files created. Contact Unisoft directly for any help.
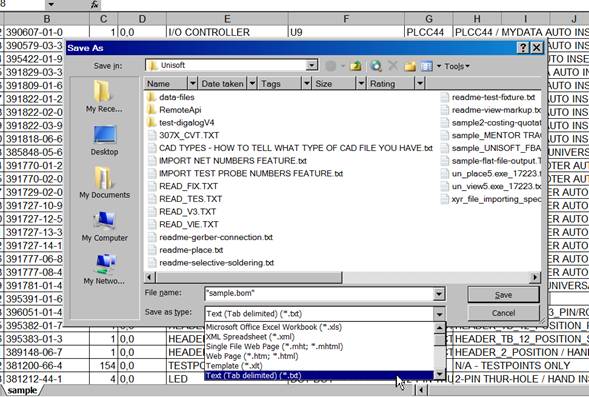
For BOM's in Microsoft EXCEL format what we recommend is to save the Excel BOM as a TAB delimited text file using the Excel SAVE AS feature (see figure below) and then import the text file as outline below.
Importing your Bill Of Materials (BOM) files is easy with the Unisoft software! The Unisoft "BOM IMPORTING" feature allows you to set up a new BOM format importer in seconds and save it for future use!
TO USE "BOM IMPORTING": Start the Unisoft software and import your CAD file as usual then click FILE from the Main Menu and click IMPORT BOM FILE and a window similar to the following is displayed.
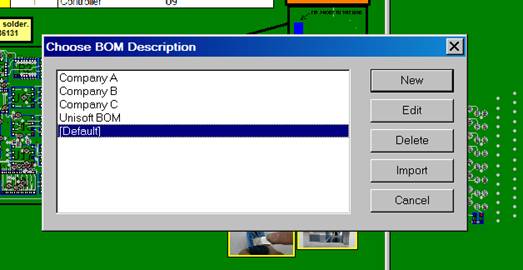
To import a BOM file for a BOM format that you have previously setup go to the window displayed and simply select the importer (for example: Company C) from the list displayed then click IMPORT then select the BOM file to be imported and click OPEN and your BOM will be imported.
To create a new BOM Importer for a new BOM format click NEW and the following window will be displayed.
You can now set up this window to import your new BOM format. Please note that this Automatic method is for importing standard tab delimited file formats. To import BOM's in column delimited formats use the Manual method detailed below. Unisoft recommends BOM's be in a tab delimited format.
For our example we will use the sample tab delimited bom file below.
Sample tab delimited BOM:
FND   Part Number   Qty   Tol   Description        Reference     Package     Misc
2     390607-01-0   1     0,0   I/O CONTROLLER     U9            PLCC44      Mydata / Mycronic AUTO INSERT
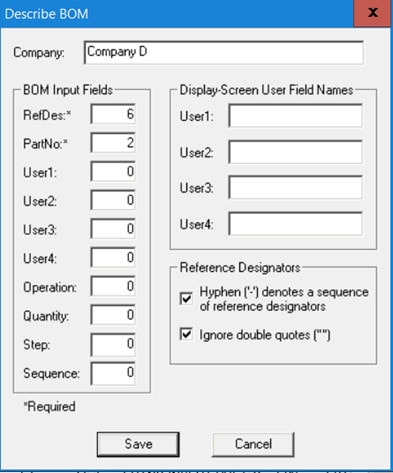
The minimum requirements for importing a BOM file into the Unisoft software are the reference designator "RefDes" and part number "PartNo" fields.
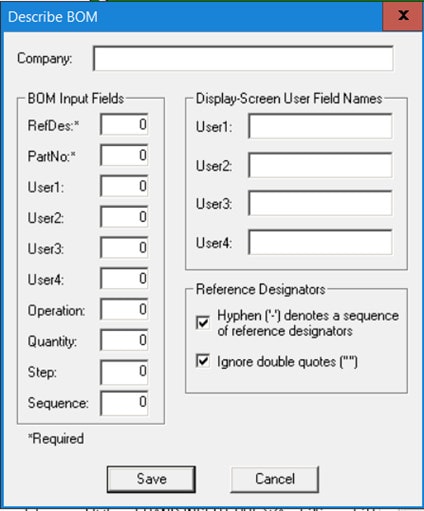
In the window below to import the BOM sample above we have set the name of the importer to "Company D" and for the reference designator tab field "RefDes" we have indicated it is located in tab field #6. We have define the sixth tab field in the sample BOM above as where the reference designator is located and in this case it is U9 (Note that if the reference designator field in the BOM contained U9-U12 or U9-12 the software would automatically break it up into U9, U10, U11 & U12).
For the part number "PartNo" field we have indicated that data is in tab field #2.
Sample tab delimited BOM:
FND   Part Number   Qty   Tol   Description        Reference     Package     Misc
2     390607-01-0   1     0,0   I/O CONTROLLER     U9            PLCC44      Mydata / Mycronic AUTO INSERT
To finish off the BOM importing script in the window below we have added the following optional fields: There are 4 USER fields (USER1-USER4) to import additional BOM data if you wish. We are importing the DESCRIPTION field from the BOM file into USER1 by setting it to tab field 5. We are then importing PACKAGE into User2 by setting it to tab field 7 and TOL to USER3 = 4 and QTY to USER4 = 3. The USER1-USER4 fields are optional.
The OPERATION field allows the import of operation instructions if they are in the BOM, for example "Hand Insert" or "Mydata SMD insert". The OPERATION field is optional.
The QUANTITY field is normally set to "0". The QUANTITY field is optional.
(Note about BOM crosschecking: Above we imported the BOM field QTY into the User4 field. This field indicates the quantity of components thought to be in a particular part number. By setting up the BOM importer with the QUANTITY field set to "0" we will get a crosscheck of what the BOM says the quantity is versus what the actual amount of components that are found in the reference designator field.)
The STEP field allows the import of process step numbers if they are in the BOM. The STEP field is optional.
The SEQUENCE field is normally set to "0". The SEQUENCE field Is reserved for use with special semi-automatic component assembly machines such as Contact Systems model CS400. The SEQUENCE field is optional.
In the window under DISPLAY SCREEN USER FIELD NAMES for USER1-USER4 we added the header text label we wish to be associated with those fields and we have used DESCRIPTION, PACKAGE, TOL and QTY respectively. On the display screen of the software these user field names are displayed as the header text and it does not affect the import of the BOM data. The DISPLAY SCREEN USER FIELD NAMES fields are optional.
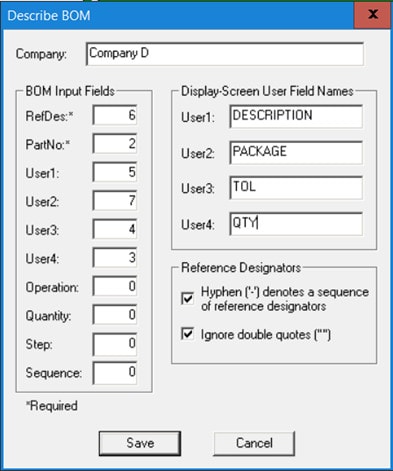
Click SAVE to save the BOM importing script "Company D". This script is now available to import your Bill Of Material.
The software by default is set up to import BOM data in TAB delimited format. You may change and control how the Unisoft software imports BOM data by editing the [BOM] section in the MARKUP.INI file located in the \WINDOWS directory.
(Note: there is a backup of the MARKUP.INI in the default install directory c:\program files\unisoft, however you must edit the MARKUP.INI in the \WINDOWS directory to have an effect on how the BOM is imported.)
The MARKUP.INI is associated with the Unisoft software modules ProntoVIEW-MARKUP, ProntoPLACE, ProntoGERBER CONNECTION, ProntoAOI and ProntoTEST-FIXTURE.
BOM files come in two major types TABS or COLUMNS. Unisoft can import both of these styles. For TABS you simply tell the software the tab position the data resides at. Unisoft recommends using TAB formatted BOM's if possible. For COLUMN style you tell the software the range of columns the data resides at.
Sample BOM:
FND   Part Number   Qty   Tol   Description        Reference     Package     Misc
2     390607-01-0   1     0,0   I/O CONTROLLER     U9            PLCC44      Mydata / Mycronic AUTO INSERT
Import script located in the MARKUP.INI file in the \WINDOWS directory:
[BOM]
Quantity=3
PartNo=2
RefDes=6
User1=4
User2=7
User3=5
User4=8
In the TAB style the fields in the BOM are separated by tabs not spaces.
In the [BOM] section above the style defaults to TABS.
QUANTITY=3 in the [BOM] indicates that the third tab is where the Quantity field will reside in the file. In this case: 1.
PARTNO=2 indicates that the second tab is where the part number resides. In this case: 390607-01-0.
REFDES=6 in the [BOM] indicates that the sixth tab is where the reference designator will reside in the file. In this case: U9.
(Note that if the Refdes field contained U9-U12 the software would automatically break it up into U9, U10, U11 & U12).
USER1=4 indicates that the fourth tab is where user field #1 resides. In this case: 0,0.
(Note: User fields #1-4 are optional. The User fields #1-4 allow you to attach any additional message information to the components. If you do not use a User Field then it must be set to 0).
USER2=7 indicates that the seventh tab is where user field #2 resides. In this case it is the package type: PLCC44.
(PLEASE NOTE: If your BOM contains a package type field then we recommend you extract that part shape data into the User2 field. When creating assembly or AOI setup programs the Unisoft software will include the user2 field package shape data in the output files it creates.)
USER3=5 indicates that the fifth tab is where user field #3 resides. In this case: I/O CONTROLLER.
USER4=8 indicates that the eighth tab is where user field #4 resides. In this case: Mydata / Mycronic AUTO INSERT.
Any fields in the [BOM] that are not used must be set to 0.
IMPORTANT: Do not define fields in the [BOM] section that are not consistently throughout the file, if you do the MARKUP.INI will not read the BOM file at all. For example if User4=7 but there is no consistent data in the 7th tab field or there is no 7th tab field at all in the file then the MARKUP.INI importer will not read the BOM file.
For Markup.exe version 5.9.5.6. or later you may change the names of the User fields that are displayed on the screen. These user fields are displayed when you click the INFO TOOL in the software then click on a component. If you do not change the label then they are by default displayed as User1, User2, User3, and User4.
You can change the user field labels by editing the [User Fields] section located in the Markup.ini file in the WINDOWS directory. For example, if you wanted to label User1=Tolerance, User2=Package, User3=Description and User4=Operation then you would do this by editing the [User Fields] located directly under the [BOM] section in the Markup.ini. For example:
Sample BOM:
[BOM]
Quantity=3
PartNo=2
RefDes=6
User1=4
User2=7
User3=5
User4=8

[User Fields]
User1=Tolerance
User2=Package
User3=Description
User4=Operation
Sample BOM:
C33   011-1276-00 CAP_100UF_10V_20%_RADIAL_ELEC FORMED_LEADS      1206      SECOND_SOURCE

[BOM]
Quantity=0
PartNo=2
RefDes=1
User1=3
User2=4
User3=5
User4=0
In the TAB style the fields in the BOM are separated by tabs not spaces.
In the [BOM] above the style defaults to TABS.
REFDES=1 in the [BOM] indicates that the first tab is where the reference designator will reside in the file. In this case C33. (Note that if the Refdes field contained C33-C36 the software would automatically break it up into C33, C34, C35 & C36).
PARTNO=2 indicates that the second tab is where the part number resides. In this case: 011-1276-00.
USER1=3 indicates that the third tab is where user field #1 resides. The User fields #1-4 allow you to attach any additional message information to the components. In this case: CAP_100UF_10V_20%_RADIAL_ELEC FORMED_LEADS.
USER2=4 indicates that the fourth tab is where user field #2 resides. In this case it is the package type: 1206.
(PLEASE NOTE: If your BOM contains a package type field then we recommend you extract that part shape data into the User2 field. When creating assembly or AOI setup programs the Unisoft software will include the user2 field package shape data in the output files it creates.)
USER3=5 indicates that the fifth tab is where user field #3 resides. In this case: SECOND_SOURCE.
Below is an example of a FIXED style BOM script located in the MARKUP.INI file.
[BOM]
Style=Fixed
PartNo=1
PartNoLen=15
RefDes=26
RefDesLen=24
User4=51
User4Len=49
Quantity=17
QuantityLen=4
Filter=23
FilterVal=""
FirstLine=21
FirstLineVal=""
User1=0
User2=0
User3=0
User1Len=0
User2Len=0
User3Len=0
Style=Fixed means that the fields in the file are in fixed columns (for example from an MRP report output file). The other allowable style is Tabs, which would mean that the fields in the file are separated by tab (0x09) characters.
Partno=1 means that the part number field starts in column 1. PartNoLen=15 means that the part number field is 15 characters long. If Style=Tabs had been specified, then PartNo=1 would have meant that the part number is the first field in the file, and PartNoLen would have been ignored.
RefDes=26 means that the Reference Designator (part name) field starts in column 26. RefDesLen=24 means that the refdes field is 24 characters long. If Style=Tabs had been specified, then perhaps RefDes=2 would have been specified to indicate that the second field on the line is the refdes field.
Similarly, User4 and User4Len are used to specify how the User4 field (component value) is to be imported.
Quantity. Quantity is imported to validate the input line. It is only checked for "all digits".
Other fields that can be imported are User1 through User3.
The Filter and FilterVal items are used only for Style=Fixed files. They specify a rule that can be used to validate lines in the BOM file. If the line contains a string at position Filter equal to the string specified by FilterVal, then the line is processed, otherwise, it is completely ignored.
The FirstLine and FirstLineVal items are used only for Style=Fixed files. Together, they specify a rule that can be used to identify the first or only line in a multi-line entry. If a line contains a string at position FirstLine that is equal to the string specified by FirstLineVal, then the line is processed as the first or only line of a multi-line entry. Otherwise, it is processed as a continuation line, and only the RefDes portion of that line will be used.
Sample BOM:
40020861-000 99 0019 D1-4,D10,D11,D13-16,D18,D19
40020872-000 99 0020 D9,D12,D17
43020273-000 99 0021 FL1-4
48024012-032 99 0023 J10
46002099-000 99 0024 K1-8
43011142-001 99 0025 L1-7
40065014-002 99 0026 LED2,LED4
[BOM]
Style=Fixed
PartNo=1
PartNoLen=12
RefDes=26
RefDesLen=55
Quantity=0
QuantityLen=0
User1=0
User1Len=0
User2=0
User2Len=0
User3=0
User3Len=0
User4=0
User4Len=0
Filter=0
FilterVal=""
FirstLine=0
FirstLineVal=""
In the COLUMN style the fields in the BOM are separated by spaces not tabs.
In the [BOM] above the STYLE=FIXED indicates the format is Column type.
PARTNO=1 in the [BOM] indicates column #1 is the starting column for where a part number may reside in the BOM file. PARTNOLEN=12 indicates column 12 is the range where a part number may reside. Therefore the part number is imported if it is within columns 1 to 12.
REFDES=25 indicates that column 25 is the starting column for where a reference designator may reside. REFDESLEN=60 indicates the range for the reference designator is 60 columns. Therefore the reference designator is imported if it is within column 26 to 80.
(Note: In this sample there are multiple reference designators indicated by dashes (Example: D1-4). The software will automatically break it up into 4 components D1,D2,D3 and D4.)
The other elements in the [BOM] are not used and therefore must be set to 0 or "".
3 PN00100282003C13,C134 C: FX CHCER 82PF 805 5% 100V
4 PN00101210007C193,C195,C198,C200,C202 C: FX CHCER 100PF 402 10% 16V
5 PN00101210007C208,C210,C212,C215,C217 C: FX CHCER 100PF 402 10% 16V
6 PN03112200102C23,C29,C483-498,C501-504 C: FX CHCER1200PF 402 5% 50V
7 PN00102212111C1258-1287,C1336-1359 C: FX CHCER1200PF 402 5% 50V
[BOM]
Style=Fixed
Quantity=0
QuantityLen=10
PartNo=14
PartNoLen=9
RefDes=23
RefDesLen=28
User1=0
User2=0
User3=0
User4=51
User1Len=0
User2Len=0
User3Len=0
User4Len=30
FirstLine=0
FirstLineVal=""
Filter=0
FilterVal=""
Unisoft: Manufacturing software since 1985